今回は【WordPress】カスタム投稿タイプをfunctions.phpで作成について
の解説になります!
こんな方に読んでほしい
- WordPressを学び始めた方へ
- WordPressのカスタム投稿タイプについて解説していきます。
- 今回はWordPressの「functions.phpで作成」について解説しております。
カスタム投稿タイプとは
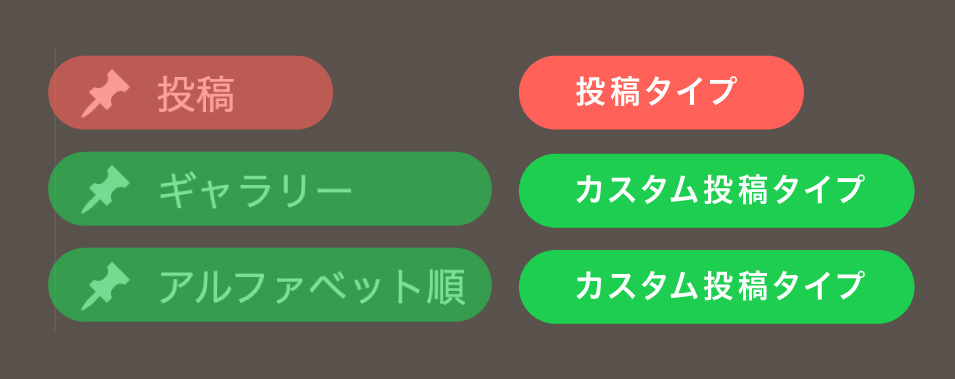
WordPressの管理画面にはデフォルトで「投稿」機能があります。
カスタム投稿タイプとは、その「投稿」タイプを増やす機能になります。
例として、お知らせはデフォルトの「投稿」を使用し、カスタム投稿タイプで「ギャラリー」、「コラム」、「実績」といった別の投稿タイプを作成し使い分けが可能になります。
イメージは以下のようになります。
functions.phpについて
「functions.php」を用意します。
functions.phpには、「投稿タイプ」の指定、「カテゴリー」「タグ」のコードを記述します。
投稿タイプの追加コードは以下のようになります。
//カスタム投稿タイプを登録
function new_post_type() {
register_post_type(
    'news',
    array(
      'label' => 'お知らせ',
      'labels' => array(
        'add_new' => '新規追加',
        'edit_item' => '編集',
        'view_item' => '表示',
        'search_items' => '検索',
      ),
      'public' => true,
      'hierarchicla' => true,
      'has_archive' => true,
      'supports' => array(
        'title',
        'editor',
        'thumbnail',
        'custom-fields',
        'excerpt'
      ),
      'menu_position' => 5
    )
  );
}
add_action('init', 'new_post_type');
今回は「お知らせ = news」で解説していきます。
register_post_typeでnewsを指定します。
「register_post_type」には以下のような指定が可能になります。
| register_post_type | カスタムポスト名を入力します。
例:「お知らせ > news」「コラム > column」 |
|---|
| add_new | 新規追加 |
|---|
| edit_item | 編集 |
|---|
| view_item | 表示 |
|---|
| search_items | 検索 |
|---|
| ‘public’ => true | 管理画面に表示しサイト上にも表示するかの指定になります。
trueは「表示」、falseは「非表示」になります。 |
|---|
| ‘hierarchicla’ => true | コンテンツを階層構造にするかどうかの指定になります。 |
|---|
| has_archive’ => true | trueにすると投稿した記事のアーカイブページを生成になります。 |
|---|
次にsupportsの指定になります。
「supports」は主に編集画面の表示、非表示の指定になります。
| title | タイトルの項目を追加 |
|---|
| editor | 本文の項目を追加 |
|---|
| thumbnail | アイキャッチ画像の項目を追加 |
|---|
| custom-fields | カスタムフィールドの項目を追加 |
|---|
| excerpt | 抜粋の項目を追加 |
|---|
| revisions | リビジョンの項目を追加 |
|---|
| author | 作成者の項目を追加 |
|---|
| comments | コメントの項目を追加 |
|---|
| ‘menu_position’ => 5 | 「投稿」の下に追加します。 |
|---|
| new_post_type | カスタム投稿タイプの呼び出し |
|---|
カテゴリーの追加について
次にカテゴリーの追加についてです。
上記のコードに追加します。
//カスタム投稿タイプを登録
function new_post_type() {
register_post_type(
    'news',
    array(
      'label' => 'お知らせ',
      'labels' => array(
        'add_new' => '新規追加',
        'edit_item' => '編集',
        'view_item' => '表示',
        'search_items' => '検索',
      ),
      'public' => true,
      'hierarchicla' => true,
      'has_archive' => true,
      'supports' => array(
        'title',
        'editor',
        'thumbnail',
        'custom-fields',
        'excerpt'
      ),
      'menu_position' => 5
    )
  );
  register_taxonomy(
	'news-cat',
	'news',
	array(
	  'label' =>  'カテゴリー',
	  'labels' => array(
		'popular_items' => 'よく使うカテゴリー',
		'edit_item' => 'カテゴリーを編集',
		'add_new_item' => 'カテゴリーを追加',
		'search_items' =>  'カテゴリーを検索',
	 ),
	  'public' => true,
	  'hierarchical' => true,
	  'rewrite' => array('slug' => 'news-cat')
	)
  );
}
add_action('init', 'new_post_type');
カテゴリーを呼び出すには、register_taxonomyを指定します。
最初に「news-cat」お知らせのカテゴリーを入力し、「news」カスタム投稿名を入力します。
タグの追加について
次にタグの追加についてです。
上記のコードに追加します。
//カスタム投稿タイプを登録
function new_post_type() {
register_post_type(
    'news',
    array(
      'label' => 'お知らせ',
      'labels' => array(
        'add_new' => '新規追加',
        'edit_item' => '編集',
        'view_item' => '表示',
        'search_items' => '検索',
      ),
      'public' => true,
      'hierarchicla' => true,
      'has_archive' => true,
      'supports' => array(
        'title',
        'editor',
        'thumbnail',
        'custom-fields',
        'excerpt'
      ),
      'menu_position' => 5
    )
  );
  register_taxonomy(
	'news-cat',
	'news',
	array(
	  'label' =>  'カテゴリー',
	  'labels' => array(
		'popular_items' => 'よく使うカテゴリー',
		'edit_item' => 'カテゴリーを編集',
		'add_new_item' => 'カテゴリーを追加',
		'search_items' =>  'カテゴリーを検索',
	 ),
	  'public' => true,
	  'hierarchical' => true,
	  'rewrite' => array('slug' => 'news-cat')
	)
  );
  register_taxonomy(
    'news-tag',
    'news',
    array(
      'label' => 'タグ',
      'rewrite' => array( 'slug' => 'news-tag' ),
      'hierarchical' => false,
      'public' => true,
      'show_in_rest' => true,
      'update_count_callback' => '_update_post_term_count',
    )
  );
}
add_action('init', 'new_post_type');
先ほと同じように、タグを呼び出すには、register_taxonomyを指定します。
最初に「news-tag」お知らせのタグを入力し、「news」カスタム投稿名を入力します。
まとめ
今回はこれで以上です。
- POINT
- WordPressカスタム投稿タイプをfunctions.phpで作成についての解説になります!
- functions.phpには「投稿タイプ」の指定、「カテゴリー」「タグ」のコードを記述します。
-
register_post_typeでカスタム投稿タイプ名を入力します。 -
register_taxonomyで「カテゴリー」「タグ」を呼び出します。
スポンサーリンク


SHU
1991年生まれ九州の宮崎県育ち高校卒業後、愛知県で自動車関係のお仕事に5年間勤め、WEB業界に転職致しました。
趣味:サッカー観戦、ゲーム、映画、漫画基本インドアです!笑
つくる、しあわせをテーマとして主にWEBに関する様々な情報を発信しています。
最新記事
関連記事